

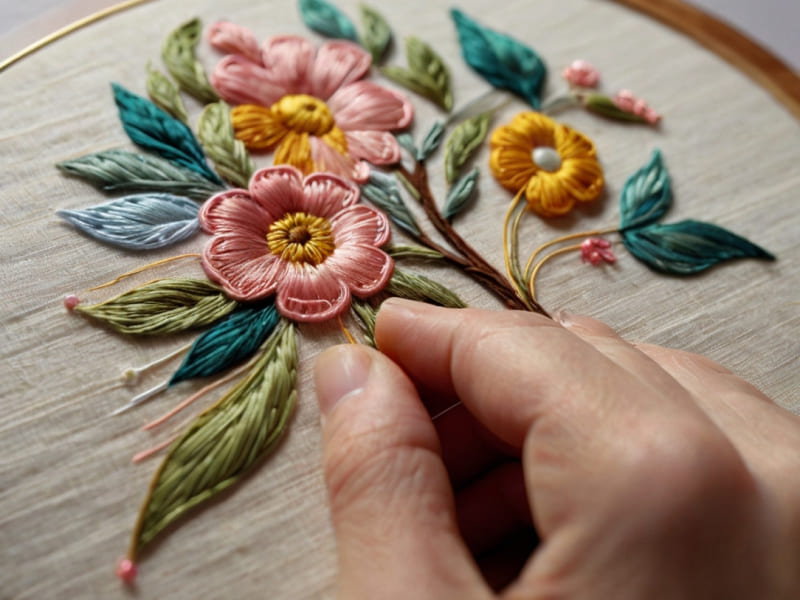
If there’s one embroidery technique that instantly elevates a project from simple to stunning, it’s the French knot. This tiny, textured stitch has completely transformed the way I approach embroidery, adding dimension, charm, and a touch of whimsy to everything I create.
I still remember the first time I tried to make a French knot in embroidery — it felt like performing a delicate dance with my needle and thread. And yes, I failed. Multiple times. But once I mastered it? Oh, the satisfaction! It was like unlocking a secret code to an embroidery world filled with fluffy roses, tiny bead-like centres, and intricate details that make any design pop.
Whether you’re struggling to get that perfect French knot stitch or are just curious about how to add this delightful technique to your embroidery repertoire, I’m here to walk you through how to do a French knot — step by step, with all the tips, tricks, and troubleshooting advice I wish I had when I started.
What is a French Knot? (And Why You’ll Fall in Love with It!)
A French knot is a small, raised stitch that looks like a tiny bead of thread sitting snugly on your fabric. It’s used in French knot embroidery to create beautiful textures—think floral centres, eyes for embroidered animals, scattered accents on clothing, or even elaborate landscapes with clusters of knots forming a dreamy effect.
The beauty of the French knot stitch lies in its versatility. Depending on the number of wraps around the needle and the type of thread you use, the knot can be small and delicate or large and bold. Once you master how to make a French knot in embroidery, you can experiment with different thread thicknesses, tension techniques, and creative patterns to give your designs a signature look.
How to Do a French Knot: Step-by-Step Guide
If someone put together such an easy to understand algorithm of action for me, I would be insanely happy. Although some of you may not like my approach. Nevertheless, here is my personal idea of the rules for this type of embroidery.
1. Gather Your Materials
Before we dive into the French knot stitch embroidery, let’s make sure you have everything you need:
- Embroidery hoop – Keeps your fabric taut for better stitch control.
- Embroidery floss – Start with a standard 6-strand cotton floss, but silk and wool also work beautifully.
- Embroidery needle – A sharp needle with a small eye makes wrapping the thread easier.
- Fabric – Cotton or linen is ideal for beginners, as they provide good grip.
- Scissors – Sharp ones ensure clean thread cuts, preventing fraying.
Having the right tools will make learning how to do French knot embroidery so much smoother. If your fabric is too flimsy or your needle too thick, you may struggle with forming consistent knots.
2. Position Your Needle and Thread
- Thread your needle and knot the end of your thread.
- Bring the needle up through the fabric at the point where you want the French knot to sit.
At this stage, be mindful of thread tension. If your thread is too loose, the knot may unravel. Too tight, and it may not sit neatly on the surface. Keeping an even tension is key.
3. Wrap the Thread Around the Needle
Now, here’s where the magic happens!
- Hold the working thread taut with your non-dominant hand.
- Wrap the thread around the needle two or three times (for tighter, smaller knots, wrap twice; for a fluffier effect, try three or more).
- Keep the wraps firm but not too tight—you want them to stay in place without slipping.
This step can feel tricky at first but don’t rush it. Take your time and make sure the wraps are even and secure before moving on.
4. Insert the Needle and Secure the Knot
- Carefully bring the needle down close to (but not in!) the same hole where you started.
- Slowly pull the needle through while keeping slight tension on the thread.
- Watch in awe as your perfectly formed French knot embroidery comes to life!
And there you have it — your first successful French knot! If it didn’t turn out perfect, don’t worry. Like any skill, practice makes perfect, and soon your knots will be smooth and uniform.
Troubleshooting: Common French Knot Problems & Fixes
I won’t sugarcoat it — French knots can be frustrating at first! If your knots are slipping, looping, or just looking sad and messy, here’s how to fix them.
1. My Knot Disappears into the Fabric!
This usually happens when the needle is inserted into the exact same hole. Try placing it just a tiny bit to the side. Even a fraction of a millimetre makes a difference!
2. My Knot is Too Loose!
Keep tension on the thread while pulling the needle through. Think of it as gently guiding the thread into position rather than yanking it. If the thread slips, try wrapping it more securely around the needle before inserting it into the fabric.
3. My Knot is Too Tight and Won’t Sit Nicely!
Don’t wrap the thread too tightly around the needle. A firm but relaxed wrap creates a fluffier, more defined French knot stitch embroidery. If the knot sits awkwardly, try using a slightly thicker thread or reducing the number of wraps.
Creative Ways to Use French Knots in Embroidery
Once you get the hang of it, French knot embroidery opens up a whole new world of possibilities! Here are some fun ways to incorporate it into your designs:
1. Floral Embroidery
Use French knots as the centre of flowers or as tiny buds in a floral arrangement. They add a stunning 3D effect!
2. Starry Night Skies & Snowflakes
Scattered French knots can mimic tiny stars or delicate snowflakes in an embroidery piece — just use metallic or white thread for an extra magical touch.
3. Eyes for Animals & Dolls
Ever tried embroidering a cute animal face? French knots are perfect for small, textured eyes that bring your designs to life.
4. Abstract & Textured Backgrounds
Create a unique look by filling an entire area with French knots — it’s time-consuming but SO satisfying. The result? A stunning, tactile embroidery piece.
Final Thoughts: Why French Knot Embroidery is a Must-Try
Learning how to do a French knot in embroidery might seem tricky at first, but trust me, once you get it, you’ll be obsessed. It’s the kind of stitch that turns a simple design into something spectacular.
So, don’t give up! Play around, and experiment with different techniques, and soon, you’ll be confidently adding French knots to every embroidery project. And when that moment of “aha!” finally happens? Oh, you’ll know. It’s a mix of victory, joy, and an immediate urge to embroider an entire bouquet of French knot flowers.
Happy stitching!
1 Comment
Pingback: Turn Trash into Cash: The DIY Craft Going Viral on TikTok - Trend Verses